Consider that you step onto a bustling job site. The framing team just wrapped the walls. Now your drywall hangers wait for the next load. But one guy talked about running low on screws again. This means more time and budget are required. You can avoid such issues with a precise and accurate estimation before starting the project.
These estimates answer how many screws per sheet of drywall you need for your project. This means there will be no need for guessing, and you can order materials precisely. Let’s explore more on this topic!
Factors That Influence Screw Quantity
You can calculate the screws right when you understand what changes the count. 6 key factors shape estimates every single time.
● Drywall Installation Type
Drywall installation type sets the baseline. Remember that walls need fewer screws than ceilings because gravity pulls less. However, walls still demand solid attachment along every stud. You should always plan extra support overhead.
● Building Codes
Building codes dictate minimums you cannot ignore. Local inspectors follow IRC tables to check spacing and edge distance strictly. You must review your jurisdiction’s rules first. Otherwise, you’ll risk rework and failed inspections.
● Size of Drywall Sheet
Drywall sheet size directly impacts your project’s total cost. Larger sheets cover more area and need more fasteners. This means that you should adjust for every dimension early.
Here is a table for quick reference on the job:
| Sheet Size | Wall Screws | Ceiling Screws | Notes |
| Standard 4×8 feet | 28–32 | 36–40 | Most common size: vertical or horizontal |
| Long 4×12 feet | 36–48 | 44–52 | A longer span needs extras for support |
| Custom size sheets | Calculate per sq ft | Add 15–20% for height | Measure on site; adjust for framing |
● Drywall Screw Length and Type
Drywall screw length and type matter for hold. Ensure that the length matches the thickness. For standard ½-inch drywall, grab 1¼-inch to 1⅝-inch coarse-thread screws on wood framing. Remember that fine-thread works on metal studs, while the wrong length leads to weak attachment or paper tears.
● Framing Spacing
Framing spacing changes everything in drywall projects. 16-inch on-center studs need screws every 16 inches in the field. Furthermore, 24-inch spacing forces tighter patterns. You should always measure framing first and adjust counts accordingly.
● Application Type
Application type adds variables. Fire-rated rooms or soundproof walls often require closer spacing. You must note these specs early in the estimate to avoid time and cost overruns later in the project lifecycle.
Screws for Wall Installation
Walls give you flexibility. Therefore, you must choose orientation based on layout and framing direction.
1. Vertical Installation
Vertical installation keeps seams tight. Teams drive 4 screws per stud on a standard 4×8 sheet. Remember to start at the top and work down. This method uses about 28 screws total. Plus, this enables you to save time and meet local code easily.
2. Horizontal Installation
Horizontal installation spans studs better in some layouts. You will place 5 screws per stud instead. Total increases to 32 screws per sheet. But you reduce butt joints and gain strength. Many teams prefer this method for speed.
Screws for Ceiling Installation
Ceilings demand extra care compared to walls since gravity works against you constantly. Teams tighten spacing to prevent sagging. Most estimators count 36 to 40 screws per 4×8 sheet. You should always start at the corners and work inward.
● Use of Adhesive
Use of adhesive cuts screws in half when done right. Experts still fasten perimeters firmly. But field screws drop dramatically. Many estimators who provide drywall estimating services recommend glued-and-screwed for cost savings and fewer surprises later.
Common Mistakes in Drywall Screw Installation
You can see these errors on job sites all the time. They cause sagging, cracking, screw pops, and expensive reworks. Here are the biggest ones to avoid.
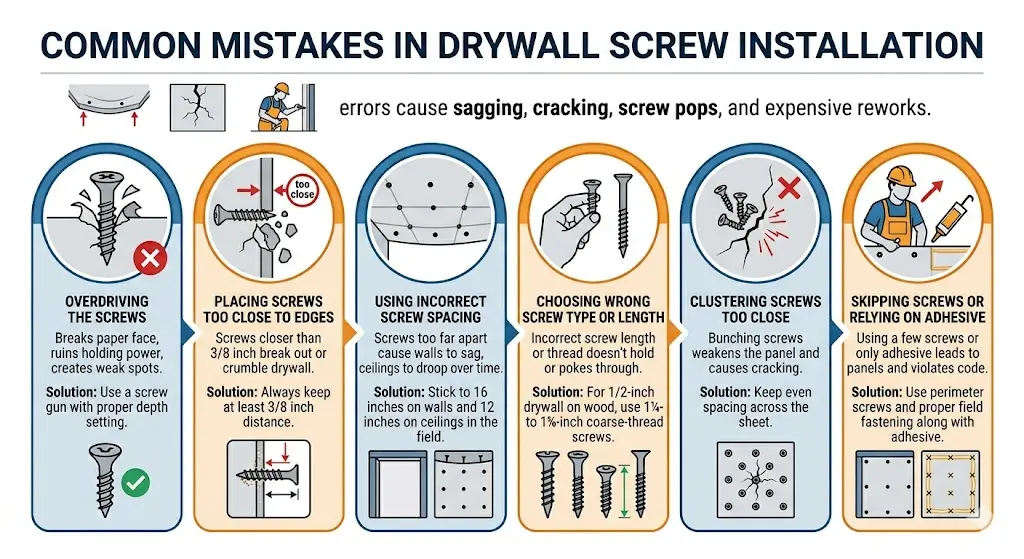
● Overdriving the Screws
If you drive screws too deeply and break the paper face, this ruins holding power and creates weak spots. The head should dimple the paper slightly without tearing through.
Solution:
Use a screw gun with the proper depth setting. Otherwise, you face extra patching and uneven walls later.
● Placing Screws Too Close to Edges
When teams put screws closer than 3/8 inch from the edge or corner, the drywall breaks out or crumbles easily.
Solution:
Always keep at least 3/8 inch distance. This simple rule prevents tears and gives a clean, strong attachment every time.
● Using Incorrect Screw Spacing
If you space screws too far apart or unevenly, walls sag and ceilings droop over time. Further, inconsistent drywall screw spacing leads to wavy surfaces and failed inspections.
Solution:
Stick to 16 inches on walls and 12 inches on ceilings in the field.
● Choosing the Wrong Screw Type or Length
When teams grab the wrong length or thread for your drywall and framing, the screws either don’t hold or poke through.
Solution:
For 1/2-inch drywall on wood, use 1¼- to 1⅝-inch coarse-thread screws. Match them right to avoid weak attachment.
● Clustering Screws Too Close Together
If you bunch screws in one area, thinking it adds strength, instead, it weakens the panel and causes cracking.
Solution:
Keep even spacing across the sheet. A consistent drywall screw pattern distributes load properly and prevents drywall failure.
● Skipping Screws or Relying Only on Adhesive
When you cut corners by using a few screws or depending solely on adhesive, this violates code and leads to loose panels.
Solution:
Adhesive helps reduce counts, but you still need perimeter screws and proper field fastening. Balance both for solid results.
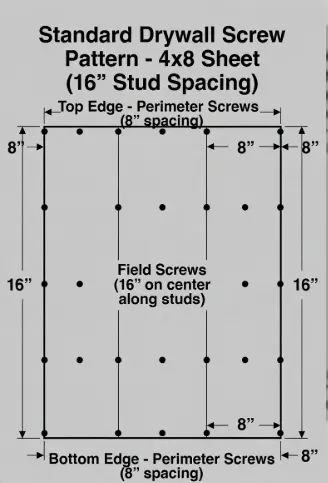
What is Screw Spacing in Drywall?
Screw spacing in drywall means the distance between fasteners along framing. You must keep edges at least ⅜-inch from the sheet edge. Field spacing follows code: 16 inches on walls, 12 inches on ceilings.
General Rule for Screw Spacing
Space screws every 12 to 16 inches, depending on location. Plus, always check local code first. Here is a visual of a standard drywall screw pattern on a 4×8 wall sheet with 16-inch studs:
Pro Level Screw Placement Tips
You can nail perfect results when you follow these four habits.
● Maintain Distance from Edge
Maintain distance from the edge religiously. Keep every screw at least 3/8 inch away from the sheet edge or corner.
How to do it: Measure once with your tape before driving. Mark lightly if needed. Many teams use a small gauge or the screw gun guide for this purpose.
Benefits: This prevents the paper face from tearing or crumbling. You will get clean edges, a stronger hold, and no ugly repairs later. This small habit stops big problems during finishing and inspection.
● Follow a Consistent Spacing Pattern
Follow a consistent spacing pattern to ensure that your walls look pro from the start.
How to do it: Start with perimeter screws every 8 inches, then place field screws every 16 inches on walls and 12 inches on ceilings along each stud. Use a story pole or chalk line for quick marking.
Benefits: Teams move faster because everyone knows the exact pattern. Walls stay flat with no waves, and inspectors approve quicker. Above all, you can reduce material waste and labor hours while delivering a cleaner finished job.
● Drive Screws Correctly
Drive screws correctly every single time.
How to do it: Set your screw gun depth so the head creates a shallow dimple in the paper without breaking through. Hold the gun straight and drive in one smooth motion. You can practice on scrap first.
Benefits: Proper dimples make mudding and sanding much easier. You will avoid popped screws later and eliminate callbacks for repairs. A tight, flat surface means faster finishing and satisfied clients.
The Role of Drywall Takeoffs & Estimation in this Whole Game
Drywall takeoffs and estimation turn guesswork into precision. Teams calculate material needs accurately to avoid shortages or excess waste. Imagine ordering 2 extra boxes of screws you never use; this is money wasted. With proper takeoffs, you can avoid this.
With takeoffs and estimation, you can plan screw placement efficiently for cost and labor savings. According to a case study, a contractor saved 12% on labor simply by mapping exact patterns before the teams arrived.
Simply put, you can estimate costs correctly to keep your project within budget. Accurate counts feed straight into bids; this means no surprises when invoices arrive.
Commonly Asked Questions
What size drywall screws should I use for 1/2-inch drywall?
Grab 1¼-inch to 1⅝-inch coarse-thread screws for wood studs on ½-inch drywall. Fine-thread works on metal. Length ensures solid penetration without overdriving. Always match the thread to the framing material for the best hold.
What is the recommended drywall screw spacing?
Space screws 16 inches on center in the field for walls and 12 inches for ceilings. Edges stay 8 inches apart.
How many screws for a ceiling drywall sheet?
You typically need 36-40 screws for a standard 4×8 ceiling sheet. Gravity requires tighter drywall screw spacing in the ceiling. Start at corners and maintain 12-inch field spacing throughout.
What is a drywall screw pattern?
Teams follow a drywall screw pattern of perimeter screws first, then even field spacing. This creates uniform support. Consistent patterns reduce sagging and give inspectors exactly what they expect every time.
How do contractors calculate drywall screws for a project?
They multiply sheets by screws per sheet, then adjust for custom cuts and adhesive use. Many estimators use a simple drywall screw calculator for speed.
What is alternate to drywall?
You can sometimes choose plywood or cement board as an alternative to drywall in wet areas or high-impact zones. Each option changes fastener counts and costs. Weigh durability against your project timeline and budget carefully.
How to choose the right fastener for a drywall project?
You can choose fasteners based on framing type, drywall thickness, and code requirements. Coarse screws suit wood, and fine metal. You should always verify length and head style for clean dimples and strong hold.
Conclusion
You now know exactly how many screws per sheet of drywall keep projects tight and profitable. Proper spacing prevents sagging; smart patterns save labor; accurate estimates eliminate waste. Moreover, you can finish projects stronger, faster, and with fewer change orders when starting with estimation. But the issue is TIME, which many contractors don’t have, and therefore, they look for professional services.
At Cost Bidding, our team delivers precise drywall takeoffs, full cost bidding, and expert estimating services that turn numbers into winning projects. You will get clear reports, realistic budgets, and peace of mind before the first screw goes in.
Ready to tighten up your next bid? Reach out to Cost Bidding today. Let us handle the details so you can focus on building!
Also see our related guides:
How Much Does Drywall Cost – Your Ultimate Guide for 2026
Cost to Finish Drywall: The Complete Homeowner’s Guide (2026 Pricing)