Suppose you are looking at the wall, noticing the hole and thinking about its solution. You know a quick fix exists, but you want it to disappear completely. You don’t want simple patching, but a completely smooth look.
Let’s discover how to handle it like a professional. Using this guide, you will get clear results at an affordable expense.
Cost-Affecting Factors You Must Know Before Moving to Steps
Time and money go side-by-side when you plan hole patching on the wall. Plus, the task might seem simple, but it will be complicated if you are doing it for the first time.
In this project, the actual work takes 45-60 minutes, excluding drying time, which you must include in the time estimates before starting the project. Furthermore, note that required materials can cost between $15 to $30 for most small holes and obviously more for the big ones.
What Materials are Required for Hole Patching on the Wall?
Arrange the following items from a nearby hardware store (or from your storeroom):
- 6-inch putty knife
- Utility knife
- 220-grit sandpaper
- A sanding block
- Adhesive mesh patches
- Lightweight spackles
- Primper or paint
- Drywall tape
- Drywall scraps
- Plywood
- Drill/driver
- Measuring tape and pencil
Use this as the checklist, so you avoid missing during patching the hole. Let’s move to the next steps.
4 Simple Steps to Patch a Hole in the Wall
Below is the step-by-step guide with pictures so you can follow the process easily.
1. Prepare the Damaged Spot First.
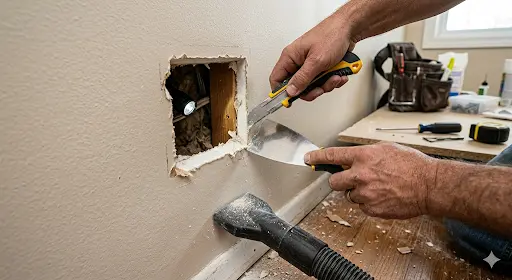
Start with cleaning. Grab the utility knife and trim away loose paper and gypsum around the edges. Work carefully at an angle so you create a smooth slope. Vacuum the dust right away because leftover particles can ruin adhesion later.
Next, you create a small indentation. Push the edges inward just a bit with your putty knife handle. This simple move lets the patch set flush instead of bulging out. This will ensure that you avoid that raised look that is repaired.
Check inside the hole with a flashlight to look for wires or pipes. Turn off the power to the room if you feel unsure. Safety comes first, and you do not want surprises halfway through.
But here is the thing. Most small holes need nothing more than this prep. You clean, indent, and move on. The whole phase takes under 10 minutes when you stay focused.
2. Apply the Patch and First Layer.
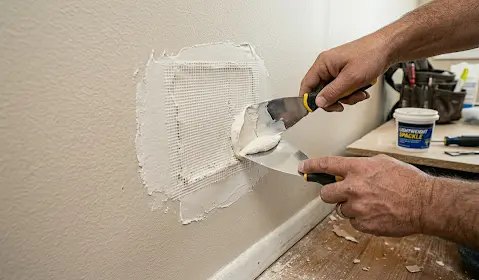
Choose the right patch for your hole size. Remember that tiny nail holes need no patch at all, and you can fill them straight with spackle. For holes between half an inch and 3 inches, center an adhesive mesh patch and press it down firmly.
Then, spread the first thin coat of lightweight spackle over the patch. Press it through the mesh so it grips well. Next, feather the edges outward with the putty knife held at a shallow angle. Extend the compound a couple of inches beyond the patch.
Let it dry for 30 to 60 minutes. Touch it to check; it should feel cool and dry, not sticky. Then, apply thin layers because thick ones crack as they dry.
For medium holes up to 6 inches, consider a stronger option, like a California patch. Cut a small drywall piece, slide it behind the opening, and secure it.
3. Build the Invisible Finish with Extra Coats.
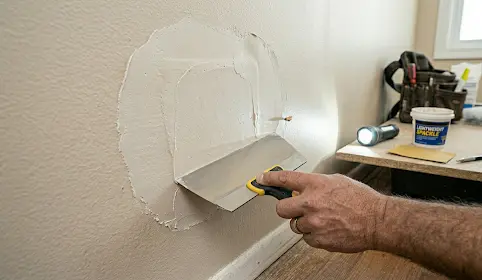
Next, add a second coat once the first dries. This time, spread it wider, about 3-4 inches past the first layer. Feather again with that shallow knife angle so the edges melt into the wall.
You know that moment when light hits the wall at an angle, and you see shadows. Avoid this by using a flashlight after each coat to catch those spots. Mark them lightly with a pencil and fix them before you move on.
A third coat helps on larger patches. Sand lightly between coats with 220-grit paper. Feathering makes all the difference here. So, pull the knife almost flat and let the compound thin out naturally. The transition disappears, and no one will spot the repair later.
4. Sand, Prime, and Paint for the Final Blend.
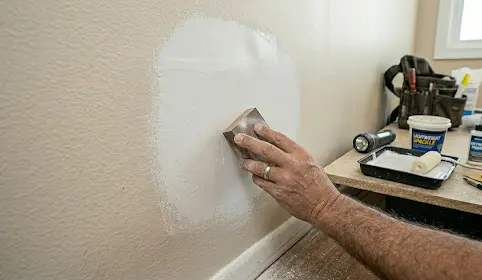
Sanding comes next, but you go easy, remembering that less pressure means fewer mistakes. Use the sanding block in gentle circles until the surface feels level. Then do the light test again. Any shadow tells you to touch it up.
Priming protects your work. So, next, brush or roll primer over the patched area and a few inches around it. Then wait 1-2 hours for complete drying.
Finally, you can start painting. Match the exact color and sheen of the wall. 2 thin coats blend better than 1 heavy layer. Feather the paint outward so the edges disappear completely.
Note: If your wall has orange peel, spray a light coat of texture after priming and knock it down gently. Practice on cardboard first so you nail the look.
Know When to Stop and Call for Help.
As already mentioned, you can handle most holes under 6 inches yourself without trouble. But bigger damage changes the game. Holes over 6 inches or areas with water stains often need a full sheet replacement. Plus, structural checks become important if you suspect wires or plumbing issues.
Professional help is suggested in those cases. By hiring an expert, you can avoid guessing and get the job done right the first time. In addition, hiring an expert for high-traffic areas, like a hallway or a kids’ room, is a wise choice as these areas come with more technicalities when you target wall hole patching.
How Much Does It Cost to Patch a Hole in the Wall?
Costs for small patches fall between $100 and $300, depending on your area and the finisher’s experience. However, larger work increases the expense, sometimes $500 or more, when texture and painting are factored in.
Pro Tip: Compare the estimates to your $15 to $30 in materials and decide based on time and confidence.
Wall Hole Patching Estimates & the Need for Accuracy
In the contractors’ world, accurate estimating is important as this helps avoid unforeseen expenses during patching, particularly when you target a bigger or more complex hole in the wall. With on-point estimates (done before executing the job), you can avoid budget surprises and complete the job on time.
A comprehensive list of takeoffs decides the accuracy of cost estimates and helps avoid financial risk during hole patching. Therefore, many contractors hire estimators for budgeting plans that improve their bids and enable them to win the contract seamlessly. You can also outsource experts for remodeling estimating services to get the job done perfectly.
You can also outsource experts for remodeling estimating services to get the job done perfectly.
Final Words
Now, you have read a complete guide on how to patch a hole in the wall. If the hole is small, you can patch it yourself. But if it is bigger than 6 inches, you must call for help. Whatever way you choose, estimate the cost of the project early, particularly when the job is to patch the big hole in the wall.
For highly accurate and precise budgeting, you can rely on Cost Bidding, which has been delivering excellence for 20+ years. Contact the team and know more about the estimating services offered!
FAQs
How do you fix a hole in sheetrock invisibly?
Clean the edges, apply a mesh patch, spread thin coats of spackle, feather carefully, sand lightly, prime, and paint with matching color. Light checks between steps catch any flaws.
What is the role of primer in a wall hole patching job?
Primer stops the compound from sucking up paint differently and creating that ghosting effect.
What is the easiest way to fix small holes in drywall?
Grab a patch kit with a spackle and a small knife. Clean the spot, fill directly or use mesh for slightly bigger holes, sand smooth, prime, and paint. Most jobs like this take under an hour.
How long does a drywall patch take to dry before painting?
Lightweight spackles dry in 30 to 60 minutes per coat. But you must wait longer in humid conditions. Primer needs 1-2 hours and needs a test with a light touch to ensure dryness.
Can you repair drywall cracks with the same method?
Yes. Embed mesh tape over the crack, cover with thin compound layers, and follow the same feathering, sanding, and painting steps. It holds better than filler alone.
Is it cheaper to DIY or hire a pro for a drywall hole repair?
DIY keeps costs at $15 to $30 for materials for small holes. Professional service often costs $100 to $300 or more, depending on location and project scope. You must choose based on hole size and your schedule.
Also read: How Much Does Drywall Cost – Your Ultimate Guide for 2026